Tools:

Choose your cookie cutter shape. Fold the felt in half and place the cookie cutter on the doubled felt.

Hold the cookie cutter in place and trace around it with the fine-tip marker.

Cut out the shape. The felt will "stick" to itself so you shouldn't need to pin your layers while you cut, but kids may struggle with this. Turn your "marked on" shape to the inside of your two layers or to the back so you don't see it on your finished ornament.

Embellish one layer to your heart's content! I used my glue gun to attach ric rac (making the ribbon a little longer than necessary and gluing the ends to the back so they would be hidden inside). Remember: kids (and some adults!) should be supervised when using the glue gun!

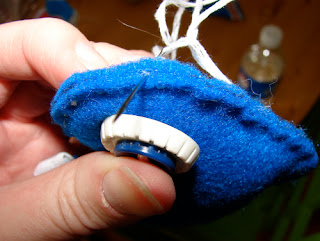
I also stacked two buttons and sewed them to the "toe" of my stocking. When I did this with kids we hot glued the buttons down instead of sewing to save time.

Using the second layer of your ornament, hot glue a length of ribbon in a loop for hanging. The ends of the ribbon will be buried inside your ornament. Be careful to let this dry completely. I stacked my layers too soon and glued them together. I had to rip them apart so I could stuff it.

Stack your two layers and stitch around the shape, leaving a large gap for stuffing the ornament. I chose to do a running stitch, but a blanket stitch would be nice, too. I also chose to use all six layers of embroidery floss for a bolder look.
HINT: When starting your stitch come up through the top layer only and then continue on stitching both layers. This will bury the knot of your thread inside the ornament.
Some of the kids who tried this craft decided to glue their ornaments together instead of stitch. Be careful!

Stuff your ornament with Fiberfill. Squeeze together the edges of the gap and finish sewing around the ornament. Or finish gluing around the ornament.

On your last stitch, come up between the layers instead of all the way through. Separate the thread in half (3 strands and 3 strands) and tie a double knot. This will bury the knot inside the ornament.

And there you have it! Be careful, this is addictive!


3 comments:
B - I miss crafting after dinner. However, S has requested that we play board game next year after TG dinner. She wanted to play Risk this year. I suggested Trivial Pursuit. J (S's hubby) made a disparaging remark about people that are good at the game. Yarrrrgh! I did let her know that I did turn into this uber-competitive game monster during board games. She was not surprised. - Love Jen
Using the cookie cutter is such a great idea! From one who can't draw, I can't believe I hadn't thought of that myself. :o)
Cute ornaments, btw.
What a fabulous idea!!
Bet you can't wait til your boy is big enough to join in and make some too.
Post a Comment