11.28.2007

A surprise and some progress

I saw the mailman go by early today, but because Jaxon and I were still in our pajamas (at 11:00!) I decided to let Charlie grab the mail when he got home. Here's proof:


Jaxon and I in our flannels. Who has time to change??


So when Charlie got home I was playing with Jaxon, and then he took Jaxon outside to play a bit so I could sew. And about THREE HOURS later I said "Did we get any interesting mail?"

Charlie's response: "Yeah, you got a package from Australia."

WHAT?!?! Any package that comes to the house is a near celebration, but one from Australia??

I totally ripped open the package and found this:


Look at this amazing quilt! This beauty was made for me by Louise at lululollylegs. When she heard that I never received a quilt in the Four Seasons Quilt Swap she whipped this up for me! For me!! I feel so special!

And can you tell from the picture how perfect it looks in my dining room? It looks fantastic with the walls and my favorite chair. I cannot thank Louise enough! And I think Margaret, the organizer of the swap, probably had something to do with this, so thank you for thinking of me!

And just so you can completely understand my crafting insanity...look at my Australian ric rac:


This is what Louise tied the quilt in. Could it be any more adorable? (Can you see the mutilated envelope in the background?? That's the one I ripped through!)

OK, enough gloating about my lovely new quilt. Pattyfair is quickly approaching (this Saturday!), and I have A LOT of sewing to do, to the detriment of two work projects.

Here is my progress:


And here is what I had hoped to complete:
12 Diaper and Wipes wristlets
12 complete with the exception of the handle -- just need to be sewn on!
5 Baby Gift Sets (Baby's Best Friend Blanket, Diaper and Wipes wristlet, 2 burp cloths)
4 blankets complete, the 5th just needs to be backed; 5 wristlets complete except handles; burp cloths cut and need to be sewn
3 Christmas blankets (in the style of Jaxon's Halloween blanket)
1 cut and piecing begun, 3 to go (!!)
2 Mama Bags
1 cut but unassembled
1 Silent Auction Donation
Oh, snap!!
Plus I'll be delivering a Baby Gift Set for twins at the show.

I'll keep you posted! And speaking of posted, I will draw the winner of the Felt Ornament giveaway tonight and let you know ASAP!

PS If you are in the central Ohio area and interested in coming to Pattyfair, a kick-ass indie craft show that benefits the Dain Yoder and Ray Cuevas Soccer Tournament for Big Brothers and Big Sisters, let me know!

11.25.2007

Felt Christmas Ornament Tutorial


Supplies:

  • Felt (those precut squares work great for this)
  • Embroidery Floss
  • Fiberfill (or your choice of stuffing)
  • Embellishments (buttons, ric rac, ribbon, even fabric paint would work!)
  • Ribbon for hanging
  • A fine-tip marker

    Tools:
  • Cookie Cutter
  • Scissors
  • Hot Glue Gun and Glue Sticks
  • Needle


    Choose your cookie cutter shape. Fold the felt in half and place the cookie cutter on the doubled felt.


    Hold the cookie cutter in place and trace around it with the fine-tip marker.


    Cut out the shape. The felt will "stick" to itself so you shouldn't need to pin your layers while you cut, but kids may struggle with this. Turn your "marked on" shape to the inside of your two layers or to the back so you don't see it on your finished ornament.


    Embellish one layer to your heart's content! I used my glue gun to attach ric rac (making the ribbon a little longer than necessary and gluing the ends to the back so they would be hidden inside). Remember: kids (and some adults!) should be supervised when using the glue gun!


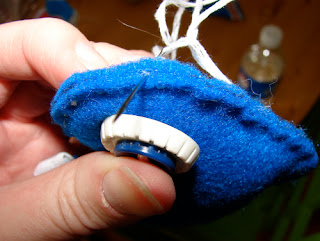
    I also stacked two buttons and sewed them to the "toe" of my stocking. When I did this with kids we hot glued the buttons down instead of sewing to save time.


    Using the second layer of your ornament, hot glue a length of ribbon in a loop for hanging. The ends of the ribbon will be buried inside your ornament. Be careful to let this dry completely. I stacked my layers too soon and glued them together. I had to rip them apart so I could stuff it.


    Stack your two layers and stitch around the shape, leaving a large gap for stuffing the ornament. I chose to do a running stitch, but a blanket stitch would be nice, too. I also chose to use all six layers of embroidery floss for a bolder look.
    HINT: When starting your stitch come up through the top layer only and then continue on stitching both layers. This will bury the knot of your thread inside the ornament.
    Some of the kids who tried this craft decided to glue their ornaments together instead of stitch. Be careful!


    Stuff your ornament with Fiberfill. Squeeze together the edges of the gap and finish sewing around the ornament. Or finish gluing around the ornament.


    On your last stitch, come up between the layers instead of all the way through. Separate the thread in half (3 strands and 3 strands) and tie a double knot. This will bury the knot inside the ornament.


    And there you have it! Be careful, this is addictive!

  • I. Can't. Stop...

    ...making these ornaments! Here's another one, this time two leaves sewn together with "holly berry" buttons from grandma's stash.


    So you have until Wednesday at 3:00pm (EST) to comment on ANY POST on my blog for a chance to win all the supplies to make a couple of these fun ornaments. The tutorial will be posted later today.

    Sometime yesterday while sitting around making all those ornaments I realized that Pattyfair is less than a week away. My plan is to make 5 baby sets (Baby's Best Friend blanket, diaper and wipes pouch, and two burp cloths); 10 individual diaper and wipes pouches; 4 Christmas-theme blankets; two Mama bags; and something non-baby for the silent auction. HHMMMM....can I do it? So far I have 4 Baby's Best Friend blankets done, I finished two last night. Here are the newest:


    As soon as I got the camera Jaxon started posing. He absolutely refused to let me take a picture without him. And, yes, he IS the boss.


    One of these is very girly, with a flannel of aqua and pink dresses. I embroidered a bow with the word "Sweet" over it for the center square (does everyone else think of Hollywood Squares when they see "center square"??). The other has my favorite flannel -- 50s looking cars and campers. I embroidered a VW bug with a cartop carrier (pulled from the flannel) on that center square.

    So I am hoping there will be A LOT more to show over the next few days.

    And finally, are you looking for a way to get rid of all those turkey leftovers? I made this recipe for White Lasagna and used turkey instead of chicken (other modifications: no onion, half the mozzarella, and spinach only on half per Charlie's request).


    Now, I do realize this has got to be full of fat, but you can make your modifications as well (I would also suggest mixing the ricotta and spinach in with the cheese sauce you make to facilitate putting it all together). I was just glad to see Jaxon eating turkey AND spinach, two things he has refused in the past.

    11.24.2007

    Surviving Black Friday

    Thanksgiving was good, but busy. We visited both sides of our family, and ate two big meals!

    Jaxon enjoys some cranberry salad

    OK, so I haven't bought into the Handmade Holiday concept completely, but I am trying to make some Christmas gifts this year. When I received the JoAnn mailer with their day-after-Thanksgiving savings, I thought I would zip on over on Friday to pick up a few things.

    Big mistake.

    I planned on being at JoAnn at 6 am (!!) and figured I would be home by 7:30. How naive. The parking lot was packed when I arrived (at 6:06) but I found a space and headed toward the snuggle flannel, on sale for $.99/yard. It was crazy. People were just throwing bolts into their carts willy nilly. I commented to one woman whose cart was overflowing that I would have to shop her cart after she went through the cutting line.

    "Oh, no," she replied. "I'm buying all of this. And those three other carts over there."

    She and her mother and sister bought 1,000 yards of flannel. I don't even know where I would store all that.

    So after a two hour 20 minute wait in the cutting line, I left JoAnn with a few yards of fabric and some craft supplies. And then I had to rush home, because I had 20 family members coming over for our extended family Thanksgiving celebration. Ack!

    My mother's side of the family (my grandparents, aunts, uncles, cousins, and cousins' kids) always get together around Thanksgiving. I'm not sure when this tradition began, but the guys always end up watching football so the rest of us create a Christmas craft! Someone comes up with an idea, brings the supplies and we sit, chat, and learn a new craft.

    This year we made felt ornaments. This was great for both the kids (with a little help from the adults) and the adults. Here are our craftings:


    And I enjoyed making these so much, and they are so easy, that I made more today:


    I plan on posting a brief tutorial tomorrow on how to make these cute felt ornaments. In the meantime, 'tis the season to de-lurk! And how do you get blog visitors to de-lurk?? Have a giveaway!!

    Post a comment to this entry to any posting by Wednesday at 3:00pm (EST) and I will randomly select a winner. What do you win? All the supplies needed to make a couple of these cute felt ornaments. That includes felt, ribbon, ric rac, vintage buttons, and a Christmas cookie cutter!

    Need something to say in your comment? How about: What's your favorite holiday family tradition??

    P.S. When I was talking to my mom about the supplies we would need for this craft I mentioned buttons. She said "Oh here, use these." She promptly pulled out a huge stash of buttons that belonged to my grandmother and great-grandmother. I had no idea she had these, or I would have been scrounging through them years ago! Even the containers are vintage and awesome!

    11.18.2007

    Blogger's Block?

    Is there such a thing? As the days passed I kept thinking of thing to blog about, but never seemed to get around to writing. Mostly because the last three weeks have been extremely hectic. This is one of the many things I've been dealing with:

    Hyper baby!


    Also dealing with: still no kitchen, although big progress (cabinets installed); finals week at school (and the high maintenance students that go with it); anxiety over upcoming grading avalanche; and guilt over not being at my sewing machine!

    I remedied the last of this list over the weekend. I spent lots of time with sweet baby Jaxon AND found time to sew a bit.

    I have been reading on many of the blogs I frequent about using a walking foot. All I've heard is praise. I kept thinking I should try one. When I sat down to put together my Christmas wish list I thought I should add a walking foot for my machine. I stumbled onto this web site: http://www.singerco.com/support/presser_help.html. Imagine my surprise after watching the video about the even feed foot (AKA walking foot) that I already have one!! I wondered what those extra feet that came with my machine were! It only took me four years to find out. Check it out:

    Apparently I have an automatic button hole foot, a blind hem foot, and a walking foot with guide bar


    So I put my walking foot to use. I've finished two blankets for a custom order and two more for Pattyfair.

    I'm thinking about calling these "Baby's Best Friend Blankets"


    And a custom order for a bag:

    The Bad Ass Satchel


    While working on the satchel I thought to myself "I'm getting much better at multitasking, I haven't made one mistake." I did all the finish on the bag and realized the strap is twisted. That's what I get for watching "Project Runway" while working on a project.

    I promise to be more blog prolific as soon as my finals are graded. I know this is true because here is a bluebird that was hanging out on our deck last week (in the snow); and because the bluebird is a symbol of happiness and hearth and home it must be true!

    Related Posts with Thumbnails